How to enable voice selection in a DPM using Philips SE Pro Transcribe/Dictate v7
This ‘How to’ guide will walk you through the process of how enable voice commands for the DPM. This takes a combination of steps using the SE Pro Dictate software and the DPM itself. This will take selections such as Author or worktype that you can user your voice to select instead of using the DPM selection with buttons. Illustrated screen shots have been included for your convenience.
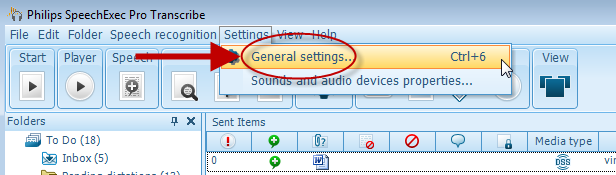
Step 1: Connect your DPM and open the SE Pro software. Go to [Settings] > [General Settings].
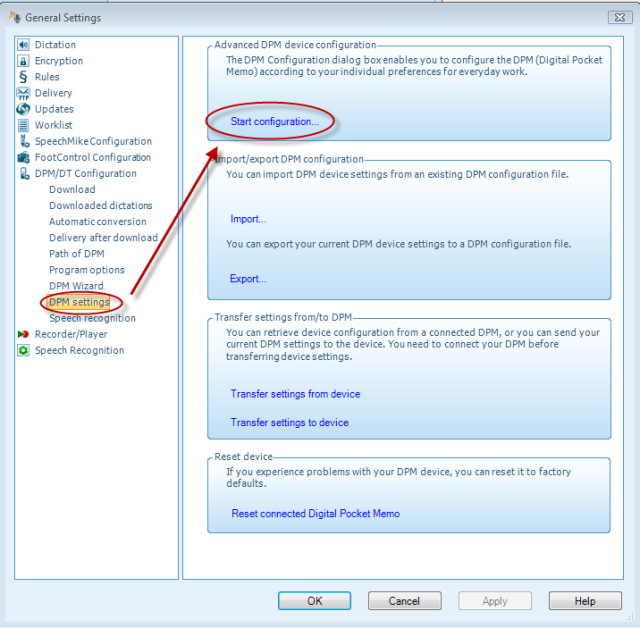
Step2: This will take you to the General Settings panel. The left hand side will have a choice of subjects. Choose [DPM/DT Configuration] > [Path of DPM]. To the right-hand side you will see the section [Advanced DPM Device Configuration].
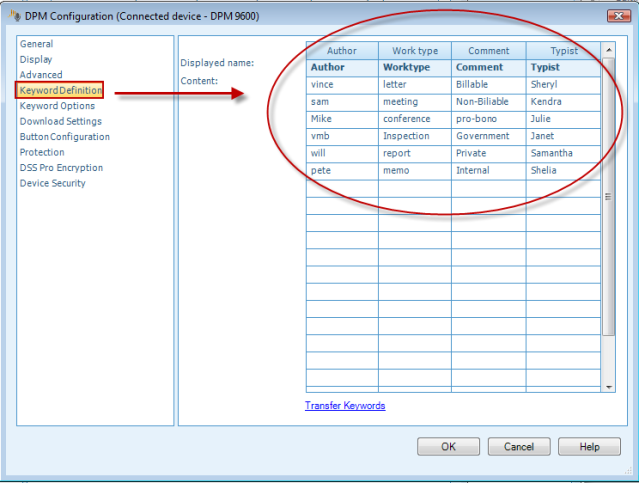
Step 3: Once in the DPM Configuration panel, go to Keyword Definition. Here you can put in for fields: Author; Worktype; Comment;Typist. In these columns you can put up to 10 field names for each keyword. In the example below you can see that I six authors, six worktypes, six comments and six typists. At the bottom of the panel you can see a link in blue that says, transfer keywords. Click this when you are ready to transfer your keywords to the DPM.
Step 4: Once you have setup your keywords you can go to the next session, [Keyword Options]. Here you can set whether you want to have voice commands. You can also set your keywords to mandatory. If you choose not to check mandatory you will be able to use them but you will need to choose them through the file menu on your DPM. If you set them to mandatory, you will be forced to select a keyword for each keyword definition that you made mandatory. You can select 1, 2, 3 or all for mandatory. As far as voice commands, you can only choose one or two keywords (columns). In the screen shot below, I chose to have the Author and Typist as voice commands. The other keyword columns, worktype and column will have to be selected through the file menu of the DPM. Hit OK to apply these settings to your DPM. You will get a confirmation that settings have been transferred to the DPM.

Step 5: Disconnect your DPM from the computer. Turn off then on. Click the round button on the front of the DPM (Menu Button) then hit either the minus (-) or plus (+) to navigate to the settings menu. Press the menu button. Navigate to the selectionVoice and Training. This will bring up your selection that you chose for Voice Commands. In the case of this example, I chose Authors and Typists as my Voice Command fields. On the screen you will see on the right side there will be a guide of Voice above the left selection button. Press this key to train your voice for each of the Authors. You will then be prompted to train the next category’s selection. In this case: ‘Typists’. Train each word in the tone you will be using when dictating. Hold the Voice button down while saying the keyword then let off of it. You may need to do this more than twice. It will prompt you for each word until you are finished.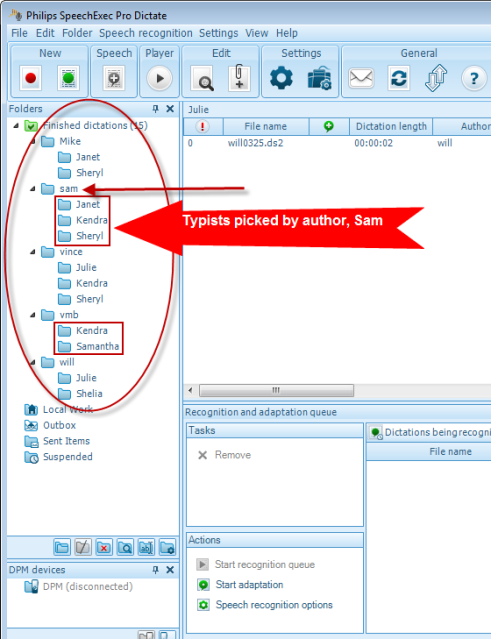
Now that you have worktype fields to choose from. Each time you pick a worktype under a specific author, a sub folder with that worktype is created. In the example above you can see that the author Sam, chose to create dications assigning the typist Janet, Kendra and Sheryl. Each time he chose a specific typist, the SE Pro software created a separate folder for each keyword associated with that recording. These associations will always fall under the authors name in such a scenarion.